
With great pleasure we announce our most recent Hyperledger Solang Release: v0.2.0 “Berlin.” This release marks an important milestone towards maturing and stabilizing our Substrate compilation target: we are leaving ink! version 3 behind us in favor of introducing compatibility with the recent ink! 4 beta release!
Status update for our Substrate target
With the “Berlin” release, Hyperledger Solang substantially improved its compatibility with many existing Ethereum Dapps and concepts within the Polkadot and Kusama ecosystem. Porting from Ethereum to a Substrate Parachain is now easier since the compiler supports almost all language constructs as Ethereum Solidity 0.8. This release represents just the beginning of a series of upcoming achievements yet to unlock for the Substrate compilation target.
Getting started with Hyperledger Solang on Substrate
Running your first Solidity contract on Substrate Parachains should be a matter of minutes. In this section we walk you through the few steps, showcasing how to use a classic Solidity example on Substrate. Namely, we are going to deploy an unmodified version of the “Voting” example contract, directly out of the Solidity documentation itself. According to Solidity documentation, the “Voting” contract example showcases a lot of Solidity’s features.
Prerequisites
To follow along, you’ll need to install Solang version “0.2.0” on your system. We offer plenty of quick installation options, including Homebrew as well as pre-built binaries for all common platforms. Please consult our documentation for instructions specific to your platform. Impatient readers may as well just use our docker option, which doesn’t require installing anything, instead.
If you want to test contracts on a local node, you’ll need to run version “0.22.1” of “substrate-contracts-node” on your local machine. Installation instructions can be found here. Again, our impatient readers may use the “paritytech/contracts-ci-linux” Docker image instead as this image contains a compatible substrate node as well (at the time of writing).
Compiling the “Voting” Solidity contract to WASM
We start with saving the source code of the “Voting” example contract into a file called “ballot.sol.”. There is no need to make any modification to the code, unless you want to tinker around a bit on your own. Now we use “solang” to compile the contract as follows:
solang compile --target substrate ballot.solThe contract should compile without any warnings. If you prefer docker, you can use the following command instead:
docker run --rm -it -v $(pwd):/sources ghcr.io/hyperledger/solang:v0.2.0 compile -o /sources --target substrate /sources/ballot.solNow, inside your current working directory, a new file called “Ballot.contract” should appear, containing the web assembly BLOB together with the metadata of the contract.
Testing on a local development node
Before deploying the compiled contract to a testnet, let’s try it out on a local node. If you are in a hurry, you may as well skip this section and proceed directly with a deployment to a testnet. Start a local node on your machine using the following command:
substrate-contracts-node --tmp --ws-external -lerror,runtime::contracts=debugAlternatively, the equivalent command for our docker users is as follows:
docker run --rm -it -p9944:9944 paritytech/contracts-ci-linux substrate-contracts-node --tmp --ws-external -lerror,runtime::contracts=debugThe odd looking “-lerror,runtime::contracts=debug” CLI option will instruct the node to use the debugging log level for the “contracts” pallet. This might come in handy as it effectively enables using the debug buffer, which allows the contract to communicate with the developer at runtime.
Deploy the contract using the contracts UI
Now head over to the contracts-UI and make sure to select ”Local Node” in the top-left corner. Then click on “Add New Contract” just below, and choose “Upload New Contract Code.” As the Contract Bundle, choose the ”Ballot.contract” file from the previous section. The node we are using comes with some special built-in accounts, which come in very handy for development purposes. The “alice” account is one of them and it is fine to use that for contract instantiation.
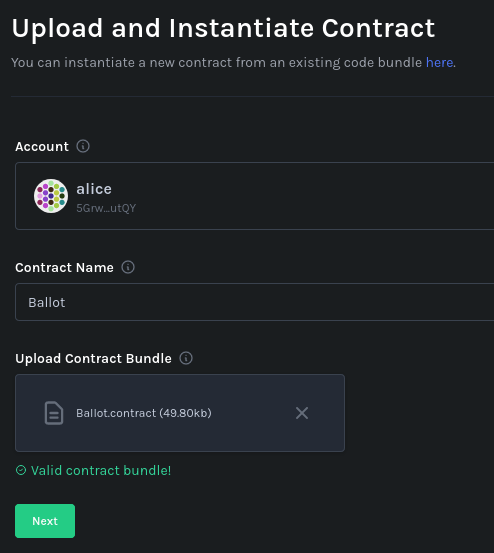
In the next section, you’ll be presented with some options for contract instantiation. Primarily, you might want to add some more “proposalName”s to our voting Ballot by clicking the big “+” button on the right side, so that we can actually choose between different voting options later. The actual values for the ”proposalName” won’t matter at this point.

When you are satisfied with your deployment options, scroll to the bottom of the page to click on “Next” and then “Upload and Instantiate.” Under the hood, this will call the intrinsic to instantiate the contract. As the node we are using is configured to have instant block finality, the operation should succeed immediately. You’ll find your freshly deployed contract on the left side and it will look like this:
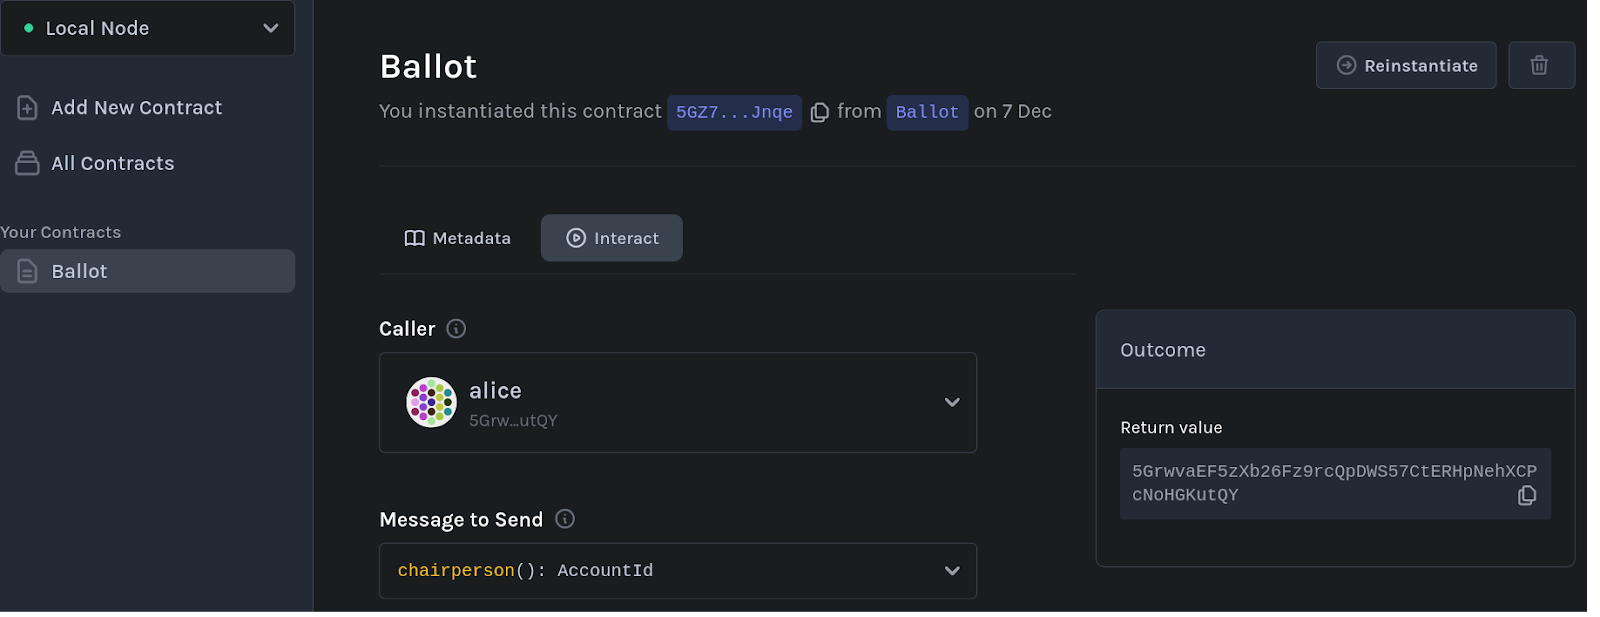
Interacting with the contract
Now we can start playing with the contract by calling some of its functions. For example, try calling the “giveRightToVote()” function using the “alice” account, to entitle “bob,” “dave” and “eve” with the rights to submit a vote. You’ll notice that, if you are trying to call the ”vote()” function using an account that was not given voting rights priorly, the contract will trap and the transaction reverts as a consequence. If you did set the log level for the contracts runtime to “debug” in the previous step, you will be able to observe failed “require” statements in your local nodes terminal output. You will find a message like this when trying to submit a “vote()” using a non-entitled account as the caller:
2022-12-07 18:45:46.496 DEBUG tokio-runtime-worker runtime::contracts: Execution finished with debug buffer: Has no right to vote
Deploying to a testnet
Finally, let’s see how we can deploy our ballot contract to the “Rococo” live testnet, turning it into a usable Dapp. For this we are going to use the polkadot JS browser extension to create some accounts. So make sure to install that in your browser if you don’t already have it.
Creating test accounts
While our local node conveniently provided us with accounts charged up with balance out of the box, this won’t be the case on any “real” network. Instead we will create dedicated accounts. Even though you could reuse any pre-existing value-bearing Accounts from polkadot.js for this experiment, it is considered best practice to always use dedicated throw-away accounts for any development purposes. In your browser, open the polkadot JS extensions and use “Create new Account,” accessible by clicking on the big “+” button on the top right side.
Once you successfully created a new account, in the polkadot JS extension, click on the ”gear” sign on the top-right corner and choose “Substrate” under “DISPLAY ADDRESS FORMAT FOR.” This will make polkadot JS to represent your Account ID in the correct address format used on “Rococo.” Naturally, deploying and calling any contract on-chain will cost some value, which is “ROC” tokens in the case of Rococo specifically. You can get some “ROC” tokens for free as follows:
1. Visit the Rococo faucet channel on matrix here.
2. Copy your Account ID in the “Substrate” address format and send the following command inside the Rococo faucet channel: “!drip YOUR_WALLET_ADDRESS:1002” (the “:1002” appended to your address is important).
3. A bot will respond to you shortly, confirming your balance. After a short while, you should also be able to confirm your balance by visiting the polkadot JS apps using this link.
If something does not work out, you can find more detailed instructions related to the Rococo faucet here.
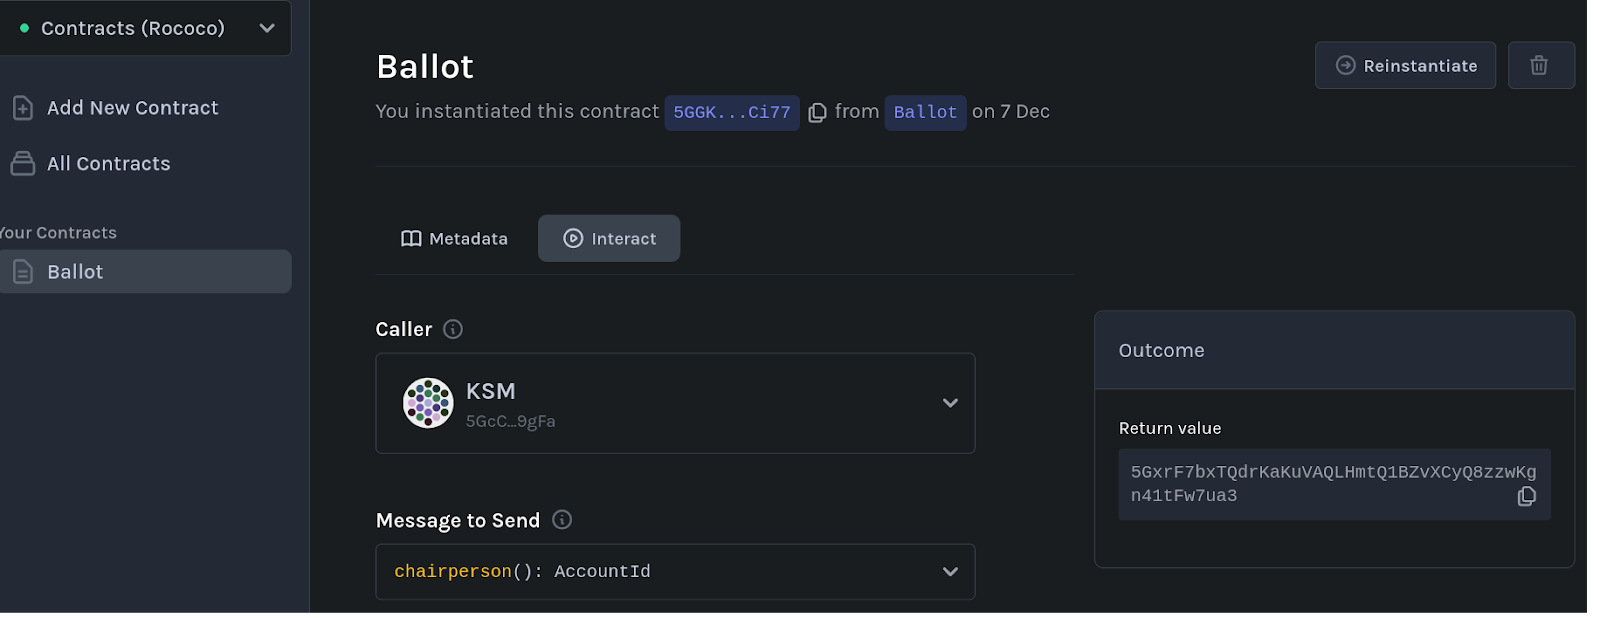
Deploying the contract to rococo
We are almost there! Back inside the contracts UI, you can switch to the “Contracts (Rococo)” network using the dropdown menu in the top left corner. Once connected, you are good to use your freshly created account, loaded up with some “ROC” tokens, to deploy the contract. From now on, instantiating your contract and interacting with it works in exactly the same way as on the local node.
Many congratulations! You have just successfully deployed your first Solidity Dapp to a substrate parachain ✨
What’s next for Substrate
Primarily, we aim to fully support cross-call support between contracts written in ink! and Solidity. At the time of writing, it is only possible to call Solidity contracts from the ink! side in a rather bare-bones way. By implementing all missing primitives and supporting interfaces for bidirectional calls between ink! and Solidity, interacting with both worlds eventually will become a natural thing to do for smart contract authors targeting Substrate-based parachains.
A future goal will be to provide Solidity contracts direct access to chain extensions. This will open up a variety of immense benefits. For example, it is the building block for accessing randomness through verifiable random functions without calling into an oracle contract. Ultimately, support for chain extensions will enable using XCM within Solidity contracts. So stay tuned for the future!
Hyperledger Solang brings Solidity to many blockchains
Hyperledger Solang is designed to bring Solidity support to many blockchains. In addition to introducing compatibility with ink! v4, this release contains many small fixes and improvements.
A brief Solana update
On the Solana side, we are focusing on Anchor integration. Our goal is to have this finished by the next Solana Foundation hackathon so that participants can build their projects using Solidity. We still need to generate Anchor IDLs from Solidity contracts and integrate Anchor discriminators with Solang so that Rust contracts can call Solidity and vice versa. Recent breaking changes made the compiler incompatible with previous versions, but we are progressively updating the existing tooling until we switch to Anchor client side libraries.
We are looking forward to hearing from you!
If any blockchain would like to add Solidity to its list of supported smart contract languages, please do not hesitate to get in touch with us. We are excited to help anyone interested in integrating with Hyperledger Solang. As we mature our existing compilation targets, any form of feedback is highly appreciated. Try out Solang now and let us know how you get on!