We recently hosted a webinar about deploying Hyperledger Fabric on Kubernetes. It was taught by Alejandro (Sasha) Vicente Grabovetsky and Nicola Paoli from AID:Tech.
The webinar contained a detailed, step-by-step instruction showing exactly how to deploy Hyperledger Fabric on Kubernetes. For those who prefer reading to watching, we have prepared a condensed transcript with screenshots that will take you through the process that has been adapted to recent updates in the Helm charts for the Orderers and Peers.
Are you ready? Let’s dive in!
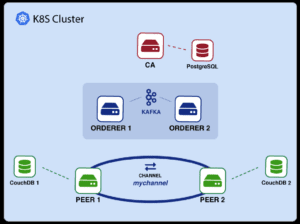
What we will build
- Fabric CA
First, we will deploy a Fabric Certificate Authority (CA) serviced by a PostgreSQL database for managing identities.
- Fabric Orderer
Then, we will deploy an ordering service of several Fabric ordering nodes communicating and establishing consensus over an Apache Kafka cluster. The Fabric Ordering service provides consensus for development (solo) and production (Kafka) networks.
- Fabric Peer
Finally, we will deploy several Peers and connect them with a channel. We will bind them to a CouchDB database.
What you’ll need
You will need 3 things to get started:
- A running Kubernetes cluster.
You can get a free managed cluster from most cloud providers; many give generous free credits.
- A domain name for your cluster.
Just get a free or cheap one.
- The repository prepared for this webinar.
Download it at https://github.com/aidtechnology/lf-k8s-hlf-webinar.
Once you have a cluster, install an Ingress controller. In this case, we use NGINX.
You’ll also install a certificate manager, which will renew the Tiller certificates to access your sub-domains by using a service called Let’s Encrypt.
DEPLOYING HYPERLEDGER FABRIC ON K8S
Let’s get the party started!
The deployment has three key parts:
- Fabric CA
Fabric Certificate Authority registration & enrolls identities
- Fabric Orderer
Fabric Ordering service provides consensus for development (solo) and production (Kafka) networks.
- Fabric Peer
Fabric Peer maintains the blockchain by communicating with the Ordering service.
Let’s go through these one by one.
- Fabric CA
To install Fabric CA, you’ll need to follow these steps:
- Install Fabric CA Helm Chart
- Generate Fabric CA Identity
- Obtain Crypto Material
- Save Crypto Material to K8S
- Generate Genesis and Channel
Let us go through them one by one.
- Install Fabric CA Helm Chart
Let’s install the actual Fabric CA Chart. We can run the command Kubectl get pods to get the actual Pod running the CA. And then, run kubectl logs, to check if the CA server has started running.
helm install stable/hlf-ca -n ca –namespace blockchain -f./helm_values/ca_values.yaml
CA_POD=$(kubectl get pods -n blockchain -l “app=hlfca,release=ca” -ojsonpath=”{.items[0].metadata.name}”)
kubectl logs -n blockchain $CA_POD | grep ‘Listening on’
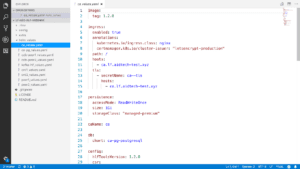
The values file for the CA is rather more involved.
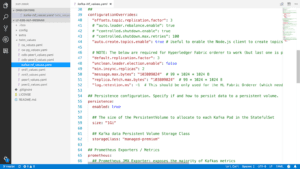
First, we define the image tag where we use Fabric 1.2. We also implement an Ingress. This is basically a way for you to access the Certificate Authority from outside the Kubernetes cluster. In the webinar, they used a test domain that they owned to enable access to the CA.
We again implement persistence to store the certificates permanently, so we don’t lose them if the POD restarts. We also specify a name for our Certificate Authority, which in this case is CA, and also specify the PostgreSQL dependency, so that our CA chart knows to create the database chart.
Then, we define some configuration, such as the Hyperledger tools version we use, which customizes one of the config maps in the chart. A config map is a Kubernetes abstraction that stores some values that are made available to the POD.
Importantly, we also specify the Certificate Signing request and an affiliation list, which in this case, is empty.
And finally, we again add a Pod affinity. In this case, we make sure that our Fabric CA server gets deployed to the same Kubernetes machine as our PostgreSQL server.
- Generate Fabric CA Identity
Once our CA is running, we will need to enroll the identity of the Fabric CA itself. For the first command, we use kubectl exec to check if a certificate exists in the Fabric CA membership service provider folder.
If it does not, we will run the Fabric CA client enroll command inside the CA, pointing to the Ingress of the CA. Then, we can run Kubectl get ingress on our own machine to obtain the Ingress connected to the Fabric CA service. So, this will essentially be the domain name that we spoke about.
Once you have that set up, you should be able to use the curl command to get the CA info. Bear in mind that this depends on the Certificate Manager setting up the TLS correctly, so you might need to wait for a little while before this works.
kubectl exec -n blockchain $CA_POD — cat/var/hyperledger/fabric-ca/msp/signcerts/cert.pem
kubectl exec -n blockchain $CA_POD — bash -c ‘fabric-ca-client
enroll -d -uhttp://$CA_ADMIN:$CA_PASSWORD@$SERVICE_DNS:7054′
CA_INGRESS=$(kubectl get ingress -n blockchain -l “app=hlfca,release=ca” -ojsonpath=”{.items[0].spec.rules[0].host}”)
curl https://$CA_INGRESS/cainfo
- Obtain Crypto Material
Now that your CA is installed and set up, you can give the certificate or the CA server to your own machine, by using the Fabric CA Client binary. If you’re using a Mac, you can for example use Homebrew to install it.
Then, you can use Kubectl exec to execute the register command inside the Fabric CA, to register the organization we will use to host the Orderers and the Peers.
Once we have registered the identity, we can use the Fabric CA client again and actually enroll the identity and get our private key and our certificate. We’ll copy the certificate from signcerts also into the admincerts folder, since this identity is the admin.
FABRIC_CA_CLIENT_HOME=./config fabric-ca-client getcacert -uhttp://$CA_INGRESS -M ./AidTechMSP
kubectl exec -n blockchain $CA_POD — fabric-ca-client register –id.name org-admin –id.secret OrgAdm1nPW –id.attrs ‘admin=true:ecert’
FABRIC_CA_CLIENT_HOME=./config fabric-ca-client enroll -uhttp://org-admin:OrgAdm1nPW@$CA_INGRESS -M ./AidTechMSP
mkdir -p ./config/AidTechMSP/admincerts
cp ./config/AidTechMSP/signcerts/* ./config/AidTechMSP/admincerts
- Save Crypto Material to K8S
Notice that when speaking with configure CA, we need to specify the lets encrypt authority’s certificate for the TLS connection, because the Fabric CA client will check that the certificate corresponds to the one it sees when connecting to the CA server. So, since our apps will use the certificate and the key, we need to use a kubectl create secret generic to add this file to the Kubernetes service as secret:
ORG_CERT=$(ls ./config/AidTechMSP/admincerts/cert.pem)
kubectl create secret generic -n blockchain hlf–org-admincert–from-file=cert.pem=$ORG_CERT
ORG_KEY=$(ls ./config/AidTechMSP/keystore/*_sk)
kubectl create secret generic -n blockchain hlf–org-adminkey–from-file=key.pem=$ORG_KEY
CA_CERT =$(ls ./config/AidTechMSP/cacert/*.pem)
kubectl create secret generic -n blockchain hlf–ca-cert–from-file=cert.pem=$CA_CERT
- Generate Genesis and Channel
Now we can run the config X Gen2. We use it twice, in the two profiles we defined to produce a genesis block for the orderers and the chain of transactions for the peers. So we have these two Kubernetes secrets to store them on our cluster. These secrets will act like the config maps that we defined before: they will act as obstructions that will hold values. But they will encrypt them at the same time and hold them in a secure manner.
cd ./config
configtxgen -profile OrdererGenesis -outputBlock ./genesis.block
configtxgen -profile MyChannel -channelID mychannel -outputCreateChannelTx ./mychannel.tx
kubectl create secret generic -n blockchain hlf–genesis –fromfile=genesis.block
kubectl create secret generic -n blockchain hlf–channel –fromfile=mychannel.tx
- Fabric Orderer
Now that we have a functioning Fabric CA, we can get to the Orderer. We will need to follow three steps to get this running.
- Install Kafka Helm Chart
- Setup Orderer Identity
- Save Orderer crypto-material to Kubernetes
- Install Fabric Orderer Helm Chart
Let’s go through them one by one:
- Install Kafka Helm Chart
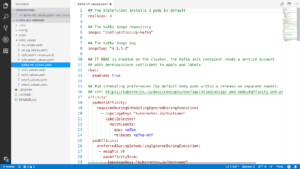
First, we need to install the Kafka cluster itself, which is made easy with an incubator chart available:
helm install incubator/kafka -n kafka-hlf –namespace blockchain -f ./helm_values/kafkahlf_values.yaml
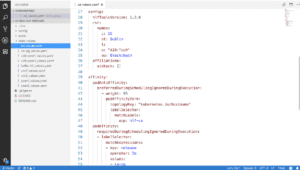
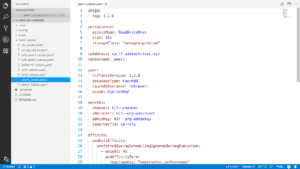
Note that you need some very specific configuration to make this work correctly.
First, we need to ensure we have at least four replicas of Kafka, in order to make it properly crash-tolerant. This means that your Kubernetes cluster must be composed of at least four machines. We also specify, again, the image and the tag that we want to use. In this case, we use the confluentinc.cv.kafka image and the tag 4.112. And we also add role-based access control to our Kubernetes cluster.
Again, we have anti-affinities to make sure that the Kafka pods actually end up on different Kubernetes machines, because otherwise, several of your Kafka pods could end up on one machine, and then one single machine crashing could actually get your network down.
And here is the most important part. The configuration overrides section contains several options that are necessary to work with Fabric. All these options are necessary but the most important one is the last one, called log.retention.ms which specifies that we never want to forget a record, because by default, Kafka will forget records after typically around two weeks. This is a common mistake.
- Set up Orderer Identity
Now, we can set up the Orderer Identity. We first use kubectl exec to connect to the fabric-ca and register the identity of the order with a CA. We then enroll the Orderer and obtain the cryptographic materials, which will identify the orderer. In this case, we specify a dummy password “ord${NUM}_pw”, but in a real deployment you should use a complex (e.g. alphanumeric of length at least 12) string instead.
Here we work with the first orderer, if you want to install the second one, just change the initial export to set the NUM to 2.
export NUM=1
kubectl exec $CA_POD -n blockchain — fabric-ca-client register –id.name ord${NUM} –id.secret ord${NUM}_pw –id.type orderer
FABRIC_CA_CLIENT_HOME=./config fabric-ca-client enroll -d -u https://ord${NUM}:ord${NUM}_pw@$CA_INGRESS -M ord${NUM}_MSP
- Save Orderer crypto-material to Kubernetes
Having created the crypto-material for the Orderer, we can save it to Kubernetes, so that we can utilise it when we launch the appropriate Helm chart. Below we show how to save the certificate and key of the Orderer.
NODE_CERT=$(ls ./config/ord_${NUM}_MSP/signcerts/*.pem)
kubectl create secret generic -n blockchain hlf–ord${NUM}-idcert –from-file=cert.pem=$NODE_CERT
NODE_KEY=$(ls ./config/ord_${NUM}_MSP/keystore/*_sk)
kubectl create secret generic -n blockchain hlf–ord${NUM}-idkey –from-file=key.pem=$NODE_KEY
- Install Fabric Orderer Helm Chart
Now we can install the actual orderers and check that they have been correctly initialised.helm install stable/hlf-ord -n ord${NUM} –namespace blockchain -f./helm_values/ord${NUM}_values.yaml
ORD_POD=$(kubectl get pods -n blockchain -l “app=hlf-ord,release=ord${NUM}” -o jsonpath=”{.items[0].metadata.name}”)
kubectl logs -n blockchain $ORD_POD | grep ‘completeInitialization’
We also specified the consensus type, Kafka, and the ID of the organization membership service provider (in our case, it’s AidTechMSP). Finally, we specify a set of secrets that we will need to correctly connect to the Certificate of Authority, such as the caServerTls secret, the genesis block secret which in this case is called hlf–genesis, and the admin certificate for the organization.
We can then get the orderer Pod using kubectrl get pods and check that the order has started by running kubectl logs and filtering for the string completeInitialization. And that’s it, you have a basic ordering service, using Kafka.
- Fabric Peer
It is finally time to install Fabric Peer, which maintains the blockchain ledger. It involves several steps, most of which should look familiar by now:
- Install CouchDB Helm Chart
- Set up Peer Identity
- Save Peer crypto-material to Kubernetes
- Install Fabric Peer Helm Chart
- Create Channel
- Fetch and Join Channel
Let us go through them one by one.
- Install CouchDB Helm Chart
The first step is to install the CouchDB database. It is similar to installing the PostgreSQL chart. Once you’ve deployed it, use the Kubernetes logs to check if it is running.
The values file in this case is really simple. It specifies the version of the Hyperledger carsDB, which in this case is 0.4.10. We also again specify a persistence, so that the couchDB database holds the data and an anti-affinity so that couchDB pods are deployed on different Kubernetes machines.
- Set up Peer Identity
To set up the peer identity we get the CA_PASSWORD, which again is a one-time password generated automatically by the chart, and we register the peer with the certificate authority just like we did with the orderer, we just specify a different ID type, in this case we specify a peer. Again, the peer will periodically try to enroll with the CA until it succeeds. Once it does you will see the strings start to appear in the logs.
kubectl exec $CA_POD -n blockchain — fabric-ca-client register –id.name peer${NUM} –id.secret peer${NUM}_pw –id.type peer
FABRIC_CA_CLIENT_HOME=./config fabric-ca-client enroll -d -u https://peer${NUM}:peer${NUM}_pw@$CA_INGRESS -M peer${NUM}_MSP
- Save Peer crypto-material to Kubernetes
Just as with the Orderer, we save the crypto-material for the Pee to Kubernetes. Again, we save the certificate and key of the Peer.
NODE_CERT=$(ls ./config/peer_${NUM}_MSP/signcerts/*.pem)
kubectl create secret generic -n blockchain hlf–peer${NUM}-idcert –from-file=cert.pem=$NODE_CERT
NODE_KEY=$(ls ./config/peer_${NUM}_MSP/keystore/*_sk)
kubectl create secret generic -n blockchain hlf–peer${NUM}-idkey –from-file=key.pem=$NODE_KEY
- Install Fabric Peer Helm Chart
Now let’s install the Fabric Peer Helm Chart.
helm install stable/hlf-peer -n peer${NUM} –namespace blockchain -f ./helm_values/peer${NUM}_values.yaml
PEER_POD=$(kubectl get pods -n blockchain -l “app=hlf-peer,release=peer${NUM}” -o jsonpath=”{.items[0].metadata.name}”)
kubectl logs -n blockchain $PEER_POD | grep ‘Starting peer
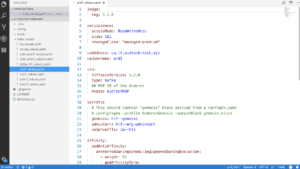
The values file looks very similar to the orderer values, since it mentions the ‘fabric-ca’ address and the peer username on the certificate authority. It also specifies that we are using CouchDB and the name of the CouchDB Helm deployment. Again, we note the secrets that we need such as the ca-TLS secret which we need to communicate securely, the channel secret specifying the channel transaction that will allow the peer to create and join channels, and the organization admin certificate key which is also necessary to join the channel to ask permission to network.
- Create Channel
Once the first peer has been created, you can create the channel. For this, you will need to specify the address of the orderer, the name of the channel, and the location of the channeled transaction.
kubectl exec -n blockchain $PEER_POD — peer channel create -o ord1-hlford.
blockchain.svc.cluster.local:7050 -c mychannel -f/hl_config/channel/mychannel.tx
- Fetch and Join Channel
Once the channel is created, you will need to fetch it and join it on every peer that you create. You can do this by running the peer channel fetch config command inside the Peer. And then run the peer channel join inside each peer container as well. Once all of that is done, you can run peer channel list to check that the peer has indeed joined the channel.
kubectl exec -n blockchain $PEER_POD — peer channel fetch
config /var/hyperledger/mychannel.block -c mychannel -o ord1-hlford.blockchain.svc.cluster.local:7050
kubectl exec -n blockchain $PEER_POD — bash -c
‘CORE_PEER_MSPCONFIGPATH=$ADMIN_MSP_PATH
peer channel join -b /var/hyperledger/mychannel.block‘
kubectl exec -n blockchain $PEER_POD — peer channel list
And that’s it! If you followed along with all the steps, you should have successfully deployed Hyperledger Fabric on Kubernetes!
Watch the replay of the webinar here, or download slides and other resources on the same page. You can also head straight to the Github repository set up for the webinar.